2020-03-05にIstio 1.5.0 がリリースされた。のでとりあえず触ってみる。くらいの気持ち。
一番大きな変更はIstiod。これまで複数のコンポーネントに分かれてたコントロールプレーンのモノリス化。管理がシンプルになるので良さそう。
カスタムポリシーやテレメトリーみたいなメッシュ拡張の機能はMixerからEnvoyに移ったみたい。これまではMixerで処理してたけど、Envoy Proxyの中でWasmを使って処理することができるようになったということなので、パフォーマンス的にもシンプルさ的にも良さそう。Wasmがどういうものか分かってないから勉強しなきゃだな。
それと istioctl analyze が色々改善されて、experimentalから卒業した。と。使ったことない。
## 試してみる環境
以前にちょっと触ってみたk3dを使ってローカルで試してみてもいいんだけど、なんとなく今日は複数ノードを使ってGKEでやろうかな。こんな感じのを用意した:
❯ kubectl get nodes
NAME                                       STATUS   ROLES    AGE    VERSION
gke-cluster-1-default-pool-d43e77a2-322n   Ready    <none>   105s   v1.14.10-gke.17
gke-cluster-1-default-pool-d43e77a2-mhnr   Ready    <none>   105s   v1.14.10-gke.17
gke-cluster-1-default-pool-d43e77a2-p48p   Ready    <none>   105s   v1.14.10-gke.17
ちなみにk3dで遊んだときの記事はこれ:
ローカルでk8sを試してみたいときはk3dが使えそう。Istioも動きそう。 - Mitsuyuki.Shiiba
あ、全然今回の記事とは関係ないけど、k3dをMacで使うときは --publish オプションでポートをマッピングしてあげないといけないみたいですね。僕はUbuntu使ってるからマッピングしなくても大丈夫でした。
https://github.com/rancher/k3d#exposing-services
## Istioの準備
このページに沿ってやればいいのかな。
ダウンロードしてきて:
❯ curl -L https://istio.io/downloadIstio | sh -
❯ cd istio-1.5.0
❯ export PATH=$PWD/bin:$PATH
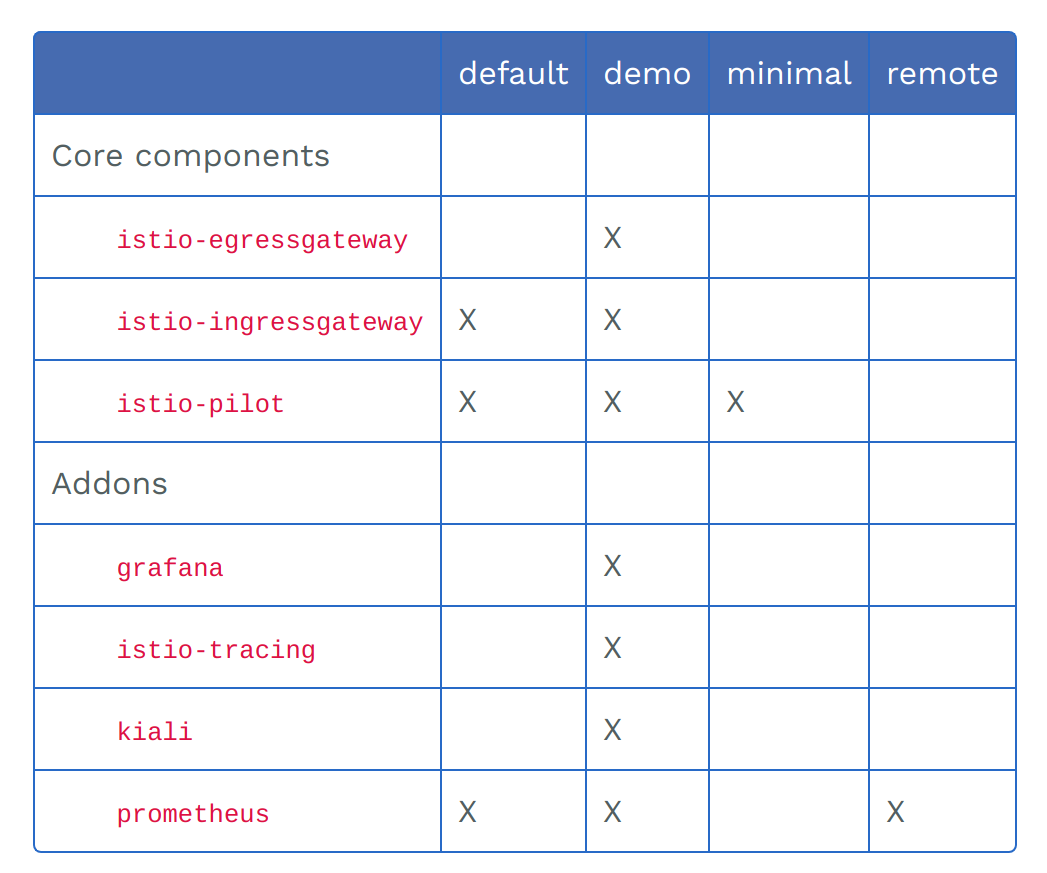
デフォルトプロファイルでインストールしてみよう:
Istio / Installation Configuration Profiles

ん?でもなんで istio-pilot が default のプロファイルに入ってるんだろう? istiod に統合したから要らなくなったんじゃないのかな?
こんな風に書いてあるんだけどな:
https://istio.io/news/releases/1.5.x/announcing-1.5/upgrade-notes/#pilot
The
istio-pilotdeployment has been removed in favor of theistioddeployment, which contains all functionality that Pilot once had. For backwards compatibility, there are still some references to Pilot.
(椎葉訳) Pilotが持っていた機能の全てを持ったistiodをデプロイすることになったのでistio-pilotのデプロイメントは削除されました。後方互換性のため、まだPilotへの参照には残っているものがあります。
ふむ。よく分かってない。まいっか。
## Istioのデプロイ
今までHelmでしかデプロイしたことないけど将来的には非推奨になるみたいだし istioctl でやってみるか。プロファイルを指定しなかったら default が使われるみたいね:
❯ istioctl manifest apply
This will install the default Istio profile into the cluster. Proceed? (y/N) y
- Applying manifest for component Base...
✔ Finished applying manifest for component Base.
- Applying manifest for component Pilot...
✔ Finished applying manifest for component Pilot.
  Waiting for resources to become ready...
  Waiting for resources to become ready...
  Waiting for resources to become ready...
  Waiting for resources to become ready...
  Waiting for resources to become ready...
  Waiting for resources to become ready...
- Applying manifest for component AddonComponents...
- Applying manifest for component IngressGateways...
✔ Finished applying manifest for component AddonComponents.
✔ Finished applying manifest for component IngressGateways.


✔ Installation complete
おー!確かにコントロールプレーンがIstiodだけだしシンプルで素敵:
❯ kubectl get pods -n istio-system
NAME                                    READY   STATUS    RESTARTS   AGE
istio-ingressgateway-598796f4d9-8zfp2   1/1     Running   0          34s
istiod-7d9c7bdd6-74gvm                  1/1     Running   0          54s
prometheus-b47d8c58c-bjjdc              2/2     Running   0          34s
あれ、結局 istio-pilot はデプロイされないのか。
## Bookinfoで確認
恒例のbookinfoサンプルアプリを入れてみる
https://istio.io/docs/examples/bookinfo/
# istio-proxyの自動設定を有効にして
❯ kubectl label namespace default istio-injection=enabled
namespace/default labeled

# アプリケーション群をデプロイ
❯ kubectl apply -f samples/bookinfo/platform/kube/bookinfo.yaml
service/details created
serviceaccount/bookinfo-details created
deployment.apps/details-v1 created
service/ratings created
serviceaccount/bookinfo-ratings created
deployment.apps/ratings-v1 created
service/reviews created
serviceaccount/bookinfo-reviews created
deployment.apps/reviews-v1 created
deployment.apps/reviews-v2 created
deployment.apps/reviews-v3 created
service/productpage created
serviceaccount/bookinfo-productpage created
deployment.apps/productpage-v1 created

# ゲートウェイをデプロイ
❯ kubectl apply -f samples/bookinfo/networking/bookinfo-gateway.yaml
gateway.networking.istio.io/bookinfo-gateway created
virtualservice.networking.istio.io/bookinfo created

# LoadBalancerのIPアドレスを取得
❯ export INGRESS_HOST=$(kubectl -n istio-system get service istio-ingressgateway -o jsonpath='{.status.loadBalancer.ingress[0].ip}')

# ブラウザで開く(Ubuntu)
❯ xdg-open http://$INGRESS_HOST/productpage
普通に動いた。

Traffic Managementの部分だけ簡単に試してみようかな:
https://istio.io/docs/tasks/traffic-management/request-routing/
まずはDestinationRuleを作っておく:
❯ kubectl apply -f samples/bookinfo/networking/destination-rule-all.yaml
destinationrule.networking.istio.io/productpage created
destinationrule.networking.istio.io/reviews created
destinationrule.networking.istio.io/ratings created
destinationrule.networking.istio.io/details created
この時点では、VirtualServiceがないのでreviewサービスに対するリクエストは全部のバージョンに振り分けられている。レビューの星の部分がでなかったり(v1)・黒かったり(v2)・赤かったり(v3)する。
次にVirtualServiceを適用:
❯ kubectl apply -f samples/bookinfo/networking/virtual-service-all-v1.yaml
virtualservice.networking.istio.io/productpage created
virtualservice.networking.istio.io/reviews created
virtualservice.networking.istio.io/ratings created
virtualservice.networking.istio.io/details created
これで全部 v1 に流れるようになる。何度リロードしても、星は出なくなった。
次は、jason というユーザーでログインしたときだけ v2 が使用されるようにVirtualServiceを更新:
❯ kubectl apply -f samples/bookinfo/networking/virtual-service-reviews-test-v2.yaml
virtualservice.networking.istio.io/reviews configured
すると jason という名前でログインすると黒い星が出るようになる。それ以外の人や未ログインの場合は星が出ないまま。
ふむ。動いてるっぽいな。よい。
## 次は
インストールをカスタマイズしてみたいな。